Friday, August 26, 2011

Scallops and Hearts

Hi, this is Colleen here today with my first post for Stuff 2 Scrap, I am so excited to be sharing my first layout with you.

I used the gorgeous border 'Leeann's Scallop Border - Mini' and I love the way it adds such an interesting pattern to my layout. I covered it with some patterned paper and filed the edges slightly to finish it off neatly.


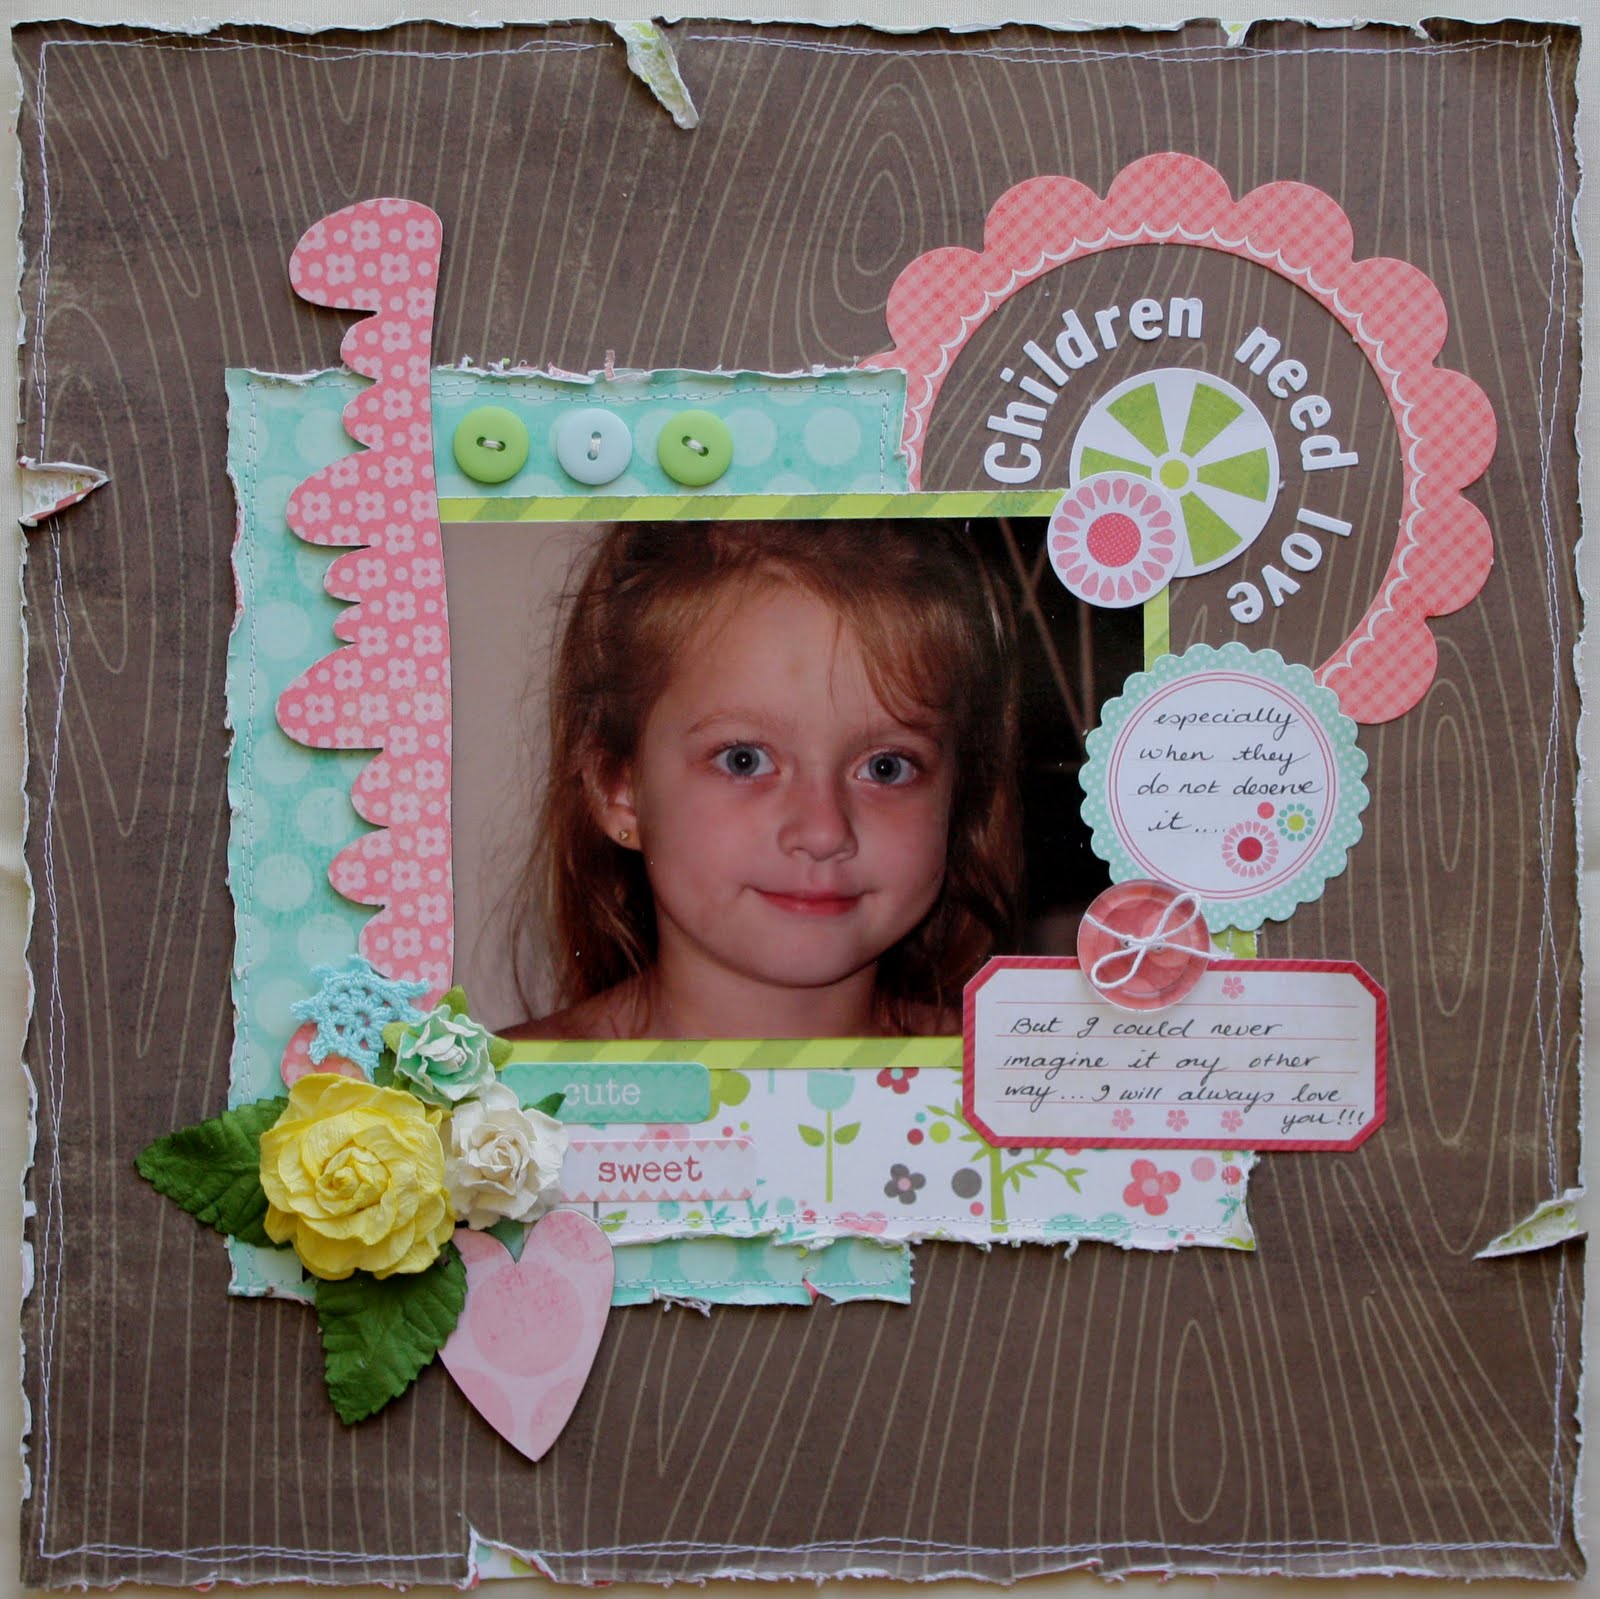
And a close up of my heart, I have used 'Chipboard Hearts #001'. In my opinion you can never have too many chipboard hearts in your stash, they make a great embellishment on any project!!


I hope you all have a crafty weekend and don't forget there is still a couple days left to get your entries in for this months challenge!!


Some Gorgeous Creations !!!!

Hello Wonderful People

I cant believe its already Friday ..... Only a few more days to get your entries in for the August Challenge, so if you are playing along please get your entries in ......

I also have a couple of things to share with you from the S2S Creative Team .....

Here is a recent layout from the very talented Rachael Funnell....


Here Rachael used the chipboard word 'beach' , added some glue and then used the kids sandpit to add the texture - How great does that look ................


Rachael also made a card using the S2S Chipboard bird ............


And now for the Gorgeous Creations of Chantal


Here Chantal has used both the small flame from Leeann Pearce and the Star Journal Block by Ann Lederhose.......


Well I hope you all have an absolutely fantastic weekend......

Until next time
Annmarie

Wednesday, August 24, 2011

I CAN do it!!!

Heya there you AWESOMELY FAB bloggy readers!!

I have a quick share for you today....

I had heaps of fun using Ann's Frame It - Large 
I painted it with gesso, then went over it with black paint then used my trusty nail file to rough it up and stress it out! It's so perfect to layer over!!


Here's what I came up with....


Close-up....Love my layers : )


Thanks for having a gander!!

Love and Peace xox

Jess M

Tuesday, August 23, 2011

Something to share!

Hi everybody!

This is my first blog post for Stuff 2 Scrap and I am a little nervous LOL
I don't know about you, but I am so over winter! Being a Qld girl,
for the past 21years, I love the heat and am looking forward to it coming back.
So to make myself feel a little better I pulled out some summer photos from last year
and scrapped a photo of my husband and myself at the beach.


I have used the gorgeous Heart balloon with arrow for this project.
I actually have a sneaky secret to share with you of how I got this finish,
and at a rather cheap cost too! I have used some metallic 3D fabric paint.
With the pink I have swirled it around to get a bit of texture to it, I love a bit 
of texture to my chippie, but you could also paint it on smooth.

I have also used grey for the arrow through the heart.
I love chipboard there are so many things you 
can do with it, always able to have something fresh and different 
to your projects. I hope you'll give this a try one day soon!
Anyways I hope you all have a wonderful week 
and until next time....
have lots of chippie fun!

Lisa

Monday, August 22, 2011

Hey there, scrappers! :)

Just a friendly reminder that you still have 9 days to get your entries in for this month's colour challenge! So plenty of time still! We have some stunning entries already in Mr Linky (located just on the left sidebar) and I'm looking forward to seeing some of your stunning work. :)

So for this month's super duper colour challenge, you need to create a page/card/otp using these colours...
  • SUGAR RUSH PINK
  • TROPICAL WATER BLUE
  • SPAGHETTI WESTERN RED
  • PANDA EYES BLACK
  • SOFT SERVE WHITE
Plus a bit of chipboard on your creation!

Sweet stuff, hey? You can find the very talented Creative Team's examples for some inspiration here.

Take care and until next time... happy scrapping! :D

Chantal
xo

Sunday, August 21, 2011

Sunday Sweets anyone???

Hello and happy Sunday!
Anita here again. 
Thought I would share some Sunday Sweetness and show you how I made this ice-cream cone that looks good enough to eat!

I used 'Choc Ice' by Ann Lederhose - I just love this chippy set! - This is what you get in the pack (plus a smaller one which is not pictured) They actually come apart - or you can leave them together if that suits you better..... I took mine apart so I could add lots of dimension!

I coloured everything except the 'ice cream top' with this glimmer mist which is the perfect cone colour!

Now time for the ice cream! I used a sticky ink (perfect medium or versamark) and ultra thick embossing powder (you can use normal embossing powder - you may just need more coats)..


When the first coat is melted and still hot (be careful), I dip it straight back into a pile of the powder to build up the thickness (I ended up with 3 coats on mine)...

Then while the embossing powder was hot and melted, I sprinkled in some little beads!  After I had the beads where I wanted them, I used the heat tool to re-melt again just to make sure those little beads don't go anywhere!

I then stuck it all together and added a cute little ribbon and ta da - looks good enough to eat don't you think!?

Thanks for hanging out with me this week!
Make sure you have a go at the challenge - lots of fun with colour and chippies!
Enjoy your Sweet Sunday!

Friday, August 19, 2011

Let's get shabby!

Hi everyone - Anita here again!
Just thought I would share this layout I created yesterday and show you how I created that delicious shabby look on the Stuff2Scrap chippy word 'Friend'.....

First of all - I painted gesso on the bare Stuff2Scrap chippy word (if you don't have gesso you could just use white paint to seal it). These are the products I used... Pearl acrylic paint and ultra thick embossing powder (you can use normal acrylic paint and normal embossing powder too - I just like it extra thick and bumpy!)...

First coat of that acrylic paint needs to be VERY generous... really pile it on!


While the paint is wet, sprinkle on the ultra thick embossing powder (it will stick to the paint).  I try not to cover the whole thing with powder - I like the white to show a little.... Before you go any firther - I would recommend opening the windows and maybe turning on the fan before you take to it with your heat gun!  The trick is to continue heating until it bubbles and the white paint bubbles up through the embossing powder.  Ooh - look at that yummy texture!


You can leave it like this but I wanted to add another coat of pearl paint over the top of that and then cooked it again for more of a shabby look! These Stuff2Scrap chippies take the heat and the layers of paint so easily - no warping or swelling - LOVE IT!


I didn't take a pic of this step but I then took some peeled paint (green) distress ink and rubbed some on the edges and a little over the top to give it some more colour (and to match the layout a little better)...


There you have it! Isn't this yet another awesome way to change up your Stuff2Scrap chippies - they are just SO VERSATILE!!!
Thanks for stopping by - hope you give this little technique a go - see you back here again soon for some more chippy goodness!


Wednesday, August 17, 2011

Want to make a custom backround with me??

Hello - Anita here again!

Thought I would share a bit of 'love heart' love and show you how I made this custom background for my layout... maybe you'd like to have a go?
First of all - I love the Stuff2Scrap love hearts - can't get enough of them - love the versatility and especially the dimension! I had a pack of the mixed love hearts (chipboard hearts #001 - you get loads in a pack!) and these T2B Heart borders (top to bottom heart borders) ....


I just took the heart border and snipped it apart to make lots of little love hearts - so versatile!! I then took a piece of kraft cardstock and attached different sized love hearts randomly with some strong glue (I used glossy accents)...


Now for the fun part... I attacked it with glimmer mist .....


I then took my distress ink and ran the pad directly over the raised hearts to make them stand out more....


Another fun thing to do with these gorgeous love hearts is to use them as a template for sewing....


Then pretty it up any way you like! I also stitched around the hearts on the left to accent them a little more. Such a fun way to use these gorgeous chippies (and I still have loads of those little hearts to use on future projects!)


So that's it for today... I am working on another really fun technique which I will share in a few days!  Be sure to have a go at the August challenge here at Stuff2Scrap too - plenty of time to get your entries in!! Have fun!

Monday, August 15, 2011

HAPPY MONDAY!!

Hello - Anita here!  Hope everyone had a great weekend!
I am working on some exciting stuff but just wanted to share a quick layout I completed last week. My layouts seem to be getting brighter and brighter lately!


 I gave those chippies a serious case of chicken pox with a red felt tip pen and then dobbed them with glossy accents to give them a fun bubble look!  I repeated that on the big red heart chippy too (but coloured it red with glimmer mist first).  See you back here again soon!

Sunday, August 14, 2011

Quick Gift!

Hey Hey Hey  : )

Here's hoping everyone has had a FABULOUSLY FAB weekend!!

In the week I had to create a last minute gift for a friend.....I didn't have anytime to pop to the shop......or much time to make a gift.....Soooooo I opened my draw full of Stuff 2 Scrap goodies....pulled a couple of bits out.....and started creating......

Both the card and the "Home Sweet Home" sign took me a little over half an hour....Noice!

For this card I used Ann's Rainy Day chippy. I gessoed it then coloured in with some indian ink markers.....then outlined with a black pen.


Next up I created a 'patchwork' little sign using a new frame chippy which will be in store very soon! I painted over it, stuck different bits of scrap paper to the back, sewed on it a bit with the sewing machine then stuck a doily in the middle, added alphas which I stitched over then popped on some sassafras lass flower stickers.....easy peasy!! I used a scrap peace of gingham fabric that I sewed on to hang it by!


Love and Peace xox

Jess M


Thursday, August 11, 2011

More OTP FUN!!!!!

Heya again AWESOME people!!

Hope you're all havine a fantastic week : )

I have some more otp shares for you today....

First up is a set of 3 little canvases.....these are soooooo quick and easy to make!


For "Blossom" I have used a new chippy that will be in store very soon!
For "Bloom" I used Potting Around 1
For "Grow" I used a new vase chippy (in store soon!!) & Flowers from the Chipboard Flower #002 Pack

Next up I have made a cute cover for my art journal....

I have used Chipboard word "Dreamer" & a flower from the Chipboard Flower #002 Pack


Thanks so much for having a look at the blog!!!

Love and Peace xox

Jess M


Monday, August 8, 2011

Off the Page FUN : )

Hiya Guys : )

So excited that it's my blogging week...have so much too share!

This week I have decided to focus on off the page projects using chipboard.....It's such an AWESOMELY versatile product.......I mean the things you can do to it and use it for are endless....only bound by your imagination!!

So for the start of the week I have got some mixed media projects to show you.....

So I took Christy Tomlinson's She Art workshop awhile ago...and I totally rediscovered my adoration for painting and art journalling....I have always painted and art journalled....but stopped a few years ago.....the class really got my mojo flowing again.....and I haven't stopped since : )

My Stuff 2 Scrap chippy stash is PERFECT for making art! I LOVE adding it to my canvases & journals....love that it adds a bit of lumpy bumpyness!!

Sooooooo today I have two canvases to show you....

First up is a "She Art" canvas.....


I have used a bird from the Chipboard Birds #001 pack, I covered it with fabric tape then doodled on it...


Next up is another canvas...


Isn't this bicycle chippy GORGEOUS?? It will be available very soon...so keep an eye out for it! I gessoed it, painted with glimmer glaze then doodled on it...


I have also used the FAB Miss Leeann Pearce's Sun'N'Clouds chippy's I have gessoed the sun then painted & doodled on. I covered the clouds in paper tape then doodled on them...


Hope you got some inspiration to get messy and use your chipboard in a different way!

I will be back in the week with some more otp fun : )

Love and Peace xox

Jess M


Friday, August 5, 2011

Hey, check out this new chippie design...


Hello scrappers! Check out these super-cool chippie "heart flowers" that I've used on my double layout, "Way 2 Go!" Aren't they so delicate? I love the detail and left raw, they really add just that bit extra to your page. They will be available in store soon.

Here's the layout in full...


You can double-click on it to see it properly (at the moment it's the perfect size for Barbie!). And here's just one more closie just for fun...


This was a really fun layout to do - here I've documented my daughter Lucy's big sprint race at her school faction carnival. It's the race that stops the school (so to speak...ha ha ha). Anyway it was an important event, so I'm glad to have documented all the details worth remembering.

I've also included her actual ribbon from her race on the page, which was cute to add. :)

You may of noticed that Lucy has grown quite a bit since the pic in my last post here. LOL. :D

Now scrappers, don't forget about the super duper awesome colour challenge right here! I'm hosting this month's challenge, and it's well worth a look! And a play! Really! :D

That's all for now - have a great weekend, scrappers!

Cheers,
Chantal :)